Creating Trello cards from new emails using Zapier
Published on May 29,2023
Automating repetitive tasks can significantly enhance productivity, and one such task that can be streamlined is the process of creating Trello cards from incoming emails. By leveraging the power of Zapier, a popular automation platform, you can seamlessly integrate your email service with Trello, ensuring that important information doesn't slip through the cracks. In this tutorial, we will demonstrate how to automatically create Trello cards from new emails using Zapier, simplifying your workflow and keeping your Trello boards up to date.
To get started, you'll need a Zapier account, a Trello account, and access to an email service such as Gmail.
Setting up the Integration
To begin the setup process, you'll need to create a new Zap in Zapier specifically for the email-to-Trello integration. Follow these steps:
- Log in to your Zapier account and navigate to your dashboard.
- Click on the "Create Zap" button to start creating a new automation.
- In the Zap editor, you'll be prompted to choose a trigger app. For this integration, select your email service, such as Gmail, from the list of available apps.
- After selecting the email service, you'll be prompted to choose the trigger event. Select "New Email" or "New Labelled Email" as the trigger for creating Trello cards. This will trigger whenever you label an email. ( In this tutorial, I'll assume you are using Gmail. Go to your Gmail account and create a new label "Trello").
- Follow the on-screen instructions to connect your email account to Zapier. If you haven't connected your email account before, you'll need to provide the necessary credentials (e.g., email address and password) or authorize Zapier to access your account using OAuth.
- Follow the instructions provided by Zapier to configure the trigger event settings according to your preferences. ( In our case, select "Trello" as the label).
- Ensure you test the trigger to verify that Zapier can successfully capture new incoming emails.
In the next section, we'll proceed with configuring Trello as the action app and mapping the email fields to Trello card attributes.
Configuring Trello as the Action App
Now that we have set up the trigger for capturing new incoming emails, let's configure Trello as the action app to create the corresponding cards. Follow these steps:
- In the Zap editor, after setting up the trigger, click on the "Add a Step" button to add an action to the Zap.
- Search for and select "Trello" as the action app from the list of available apps.
- If you haven't connected your Trello account before, Zapier will prompt you to authorize the connection. Click on the "Connect an Account" button to proceed.
- Follow the instructions provided by Zapier to complete the authorization process.
- Select the action event as " Create new Card"
- You'll be prompted to select the Trello board and list where the cards will be created.
- Choose the appropriate Trello board from the dropdown menu. This is the board where you want the cards to be added.
- After selecting the board, you can further specify the list where the cards should be placed. Pick the desired list from the available options.
Note: If you can't find the desired board or list in the dropdown menu, make sure you have the necessary permissions within Trello, as Zapier
In the next section, we will proceed with mapping the email fields to Trello card attributes, ensuring that the relevant information from the emails is correctly transferred to the Trello cards.
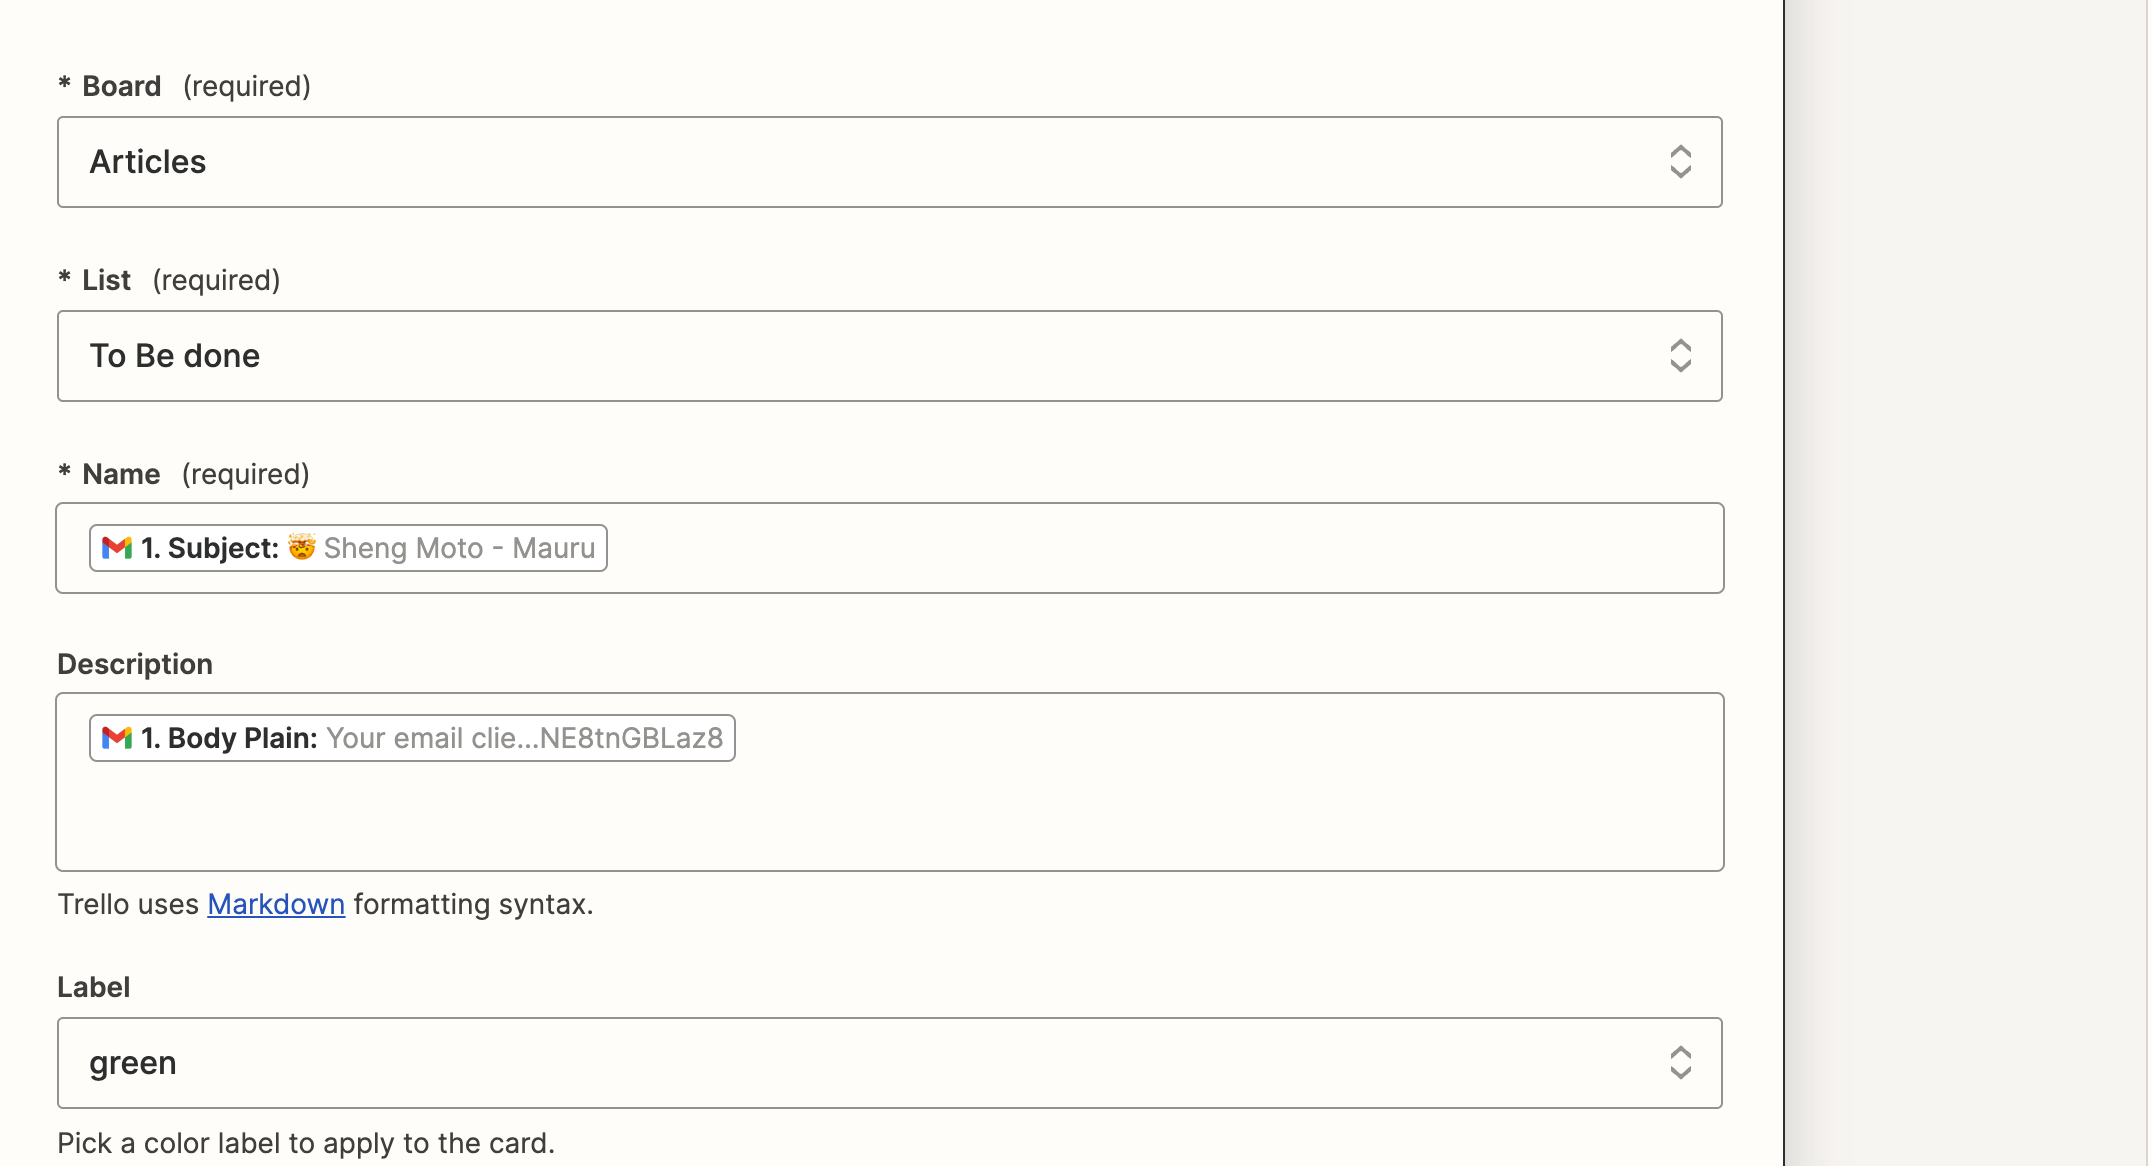
Mapping Email Fields to Trello Card Attributes
Field mapping is a crucial step in the integration process as it determines how the information from the incoming emails will be transferred and mapped to specific attributes of the Trello cards.
By mapping the relevant email fields to Trello card attributes, you ensure that the right data is captured and properly displayed on the created cards.
To successfully map the email fields to Trello card attributes, it's important to understand the available options. Here are some commonly used email fields and corresponding Trello card attributes:
Email Fields:
- Subject: The subject line of the email.
- Body: The main content or message of the email.
- Sender: The email address or name of the sender.
- Recipients: The email addresses of the recipients.
- Date: The date and time the email was received.
- Attachments: Any files or documents attached to the email.
Trello Card Attributes:
- Title: The title or name of the Trello card.
- Description: A detailed description or additional information about the card.
- Labels: Categorization labels assigned to the card.
- Members: Trello users assigned to the card.
- Due Date: A specific date or deadline associated with the card.
- Attachments: Files or documents attached to the card.
To map the relevant email fields to Trello card attributes, follow these steps:
- Within the Zap editor, locate the Trello action step and look for the field mapping section.
- In this section, you'll see a list of available email fields on the left and the corresponding Trello card attributes on the right.
- Click on the dropdown menu next to each Trello card attribute and select the appropriate email field that should be mapped to it.
- Repeat this process for each relevant email field and its corresponding Trello card attribute.
- If desired, you can also apply any necessary transformations or formatting options to ensure the data is displayed correctly on the Trello cards.
Note: Make sure to review and double-check your field mappings to ensure that the desired information is correctly transferred from the email to the Trello cards.
Customizing Trello Card Creation
Zapier offers flexibility in customizing the Trello card creation process by allowing you to add extra actions or modifications. This enables you to enhance the automation and tailor it to your specific workflow. Here's how you can add these customizations:
- Within the Zap editor, locate the Trello action step that creates the card.
- Click on the "Add a Step" button below the Trello action step to insert a new action.
- Select the desired action from the available options. This can include actions within Trello or actions from other apps that integrate with Zapier.
- Configure the settings for the additional action, specifying the details such as due dates, assigning members, setting labels, or any other modifications you want to apply.
Here are some examples of customizations you can apply to enhance the Trello card creation process:
Adding Due Dates:
After the Trello card is created, use an additional action to set a due date for the card. This can be based on specific criteria, such as the email's received date or a predetermined timeframe.

Assigning Members:
If you have a team working on the Trello board, you can assign members to the card automatically. Use an additional action to assign specific team members based on email content, sender, or any other relevant information.

Setting Labels:
Apply labels to the Trello card based on the email's content or other criteria. This can help categorize and visually organize the cards within the Trello board.
Adding Descriptions or Comments:
Include additional information from the email as descriptions or comments on the Trello card. This can provide more context and details for the task at hand.

Creating Checklists or Attachments:
Depending on your requirements, you can automatically generate checklists or attach relevant files from the email to the Trello card. This facilitates better task management and keeps all necessary information in one place.

Remember, these are just a few examples, and the possibilities for customization are vast. Zapier allows you to integrate with numerous apps and services, giving you the ability to add various actions and modifications to the Trello card creation process based on your specific needs.
Testing the Workflow
Testing allows you to identify any potential issues, validate the automation, and make necessary adjustments before relying on the workflow in your day-to-day operations.
To test the workflow, follow these steps:
- In the Zap editor, review your Zap configuration and ensure that all necessary settings, mappings, and customizations are in place.
- Once you're satisfied with the setup, enable the Zap. This will activate the automation and make it ready to trigger upon receiving a new email.
- To initiate a test, add the label "Trello" to any email-specified email address associated with the trigger app.
- Zapier will capture the test email and automatically create a Trello card based on your configured settings.
- Allow a few moments for Zapier to complete the action, and then proceed to review the test results.
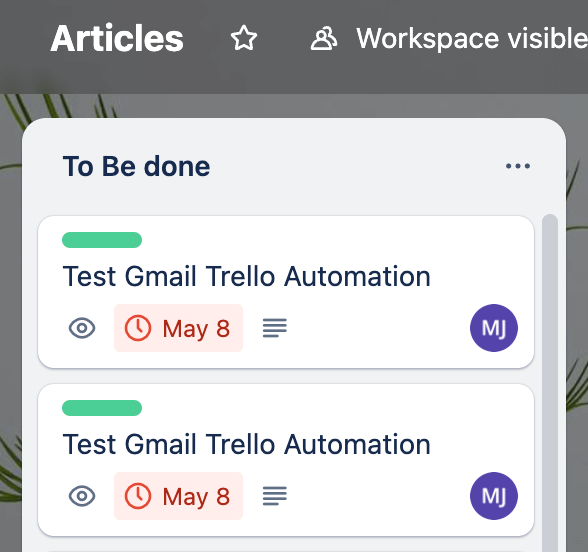
By thoroughly testing the workflow and addressing any potential issues, you can confidently rely on the automation to create Trello cards from new emails seamlessly.
Conclusion
In this tutorial, we covered the essential steps to create Trello cards from new emails using Zapier. Let's recap the key points:
- Setting up the integration by creating a Zap and selecting the email service as the trigger app.
- Authorizing Zapier to access your email account and configuring the trigger event to capture new incoming emails.
- Configuring Trello as the action app and mapping the relevant email fields to Trello card attributes.
- Customizing the Trello card creation process by adding additional actions or modifications as needed.
By automating this process, you can streamline your workflow, reduce errors, and focus on more critical aspects of your work.
Zapier offers a wide range of integrations, enabling you to automate and connect various apps and services with Trello. Take advantage of this versatility to explore additional Zapier-Trello integrations. From creating cards from other sources to updating Trello cards based on different triggers, there are endless possibilities to explore.
Remember, automation is a continuous process, so feel free to refine and adapt your workflows as your needs evolve. Happy automating!
Do you need help creating such integrations? Book a call with me today.