Manually chasing leads is exhausting. You send an email, they reply with a question, and now you’re stuck in a back-and-forth, checking your inbox every few hours so you don’t miss anything.
What if you could have a smart assistant that instantly replies to leads, personalises responses, and logs every interaction in your CRM… without you touching a thing?
In this tutorial, we’ll build an AI-powered CRM assistant that connects HubSpot, n8n, and ChatGPT. You’ll end up with a system that:
- Captures form submissions from HubSpot
- Sends the message to ChatGPT for a smart reply
- Logs the AI’s response directly on the lead’s profile in HubSpot
- Is easy to expand into SMS, email replies, or other channels later
And the best part? We’ll do it all in one weekend.
What You’ll Need
- HubSpot CRM (free account or developer test account)
- n8n (free cloud account or self-hosted)
- OpenAI API key (gives access to GPT models)
- Basic familiarity with forms, workflows, and APIs (helpful but not required)
Step 1: Create a HubSpot Form
Our assistant needs something to trigger on, so we’ll start with a form where leads can send messages.
- Go to Marketing → Forms in HubSpot.
- Click Create Form → Choose Embedded Form (or Standalone for testing).
- Add these fields:
- First Name → maps to
firstname - Last Name → maps to
lastname - Email Address → maps to
email - What do you need help with? → create a new contact property called
service_inquiry. - Publish the form and save its share link.
💡 Important: Ensure every form field is mapped to a contact property- ensures we can send the data to n8n later.

Image: Huspot form with a new property created
Step 2: Send Form Data to n8n via a HubSpot Workflow
HubSpot will handle sending the form details to our automation.
- Go to Automation → Workflows.
- Click Create Workflow → Start from scratch → Contact-based.
- Set the trigger:
- Form submission → Select the form you just created.
- Add an action:
- Trigger a Webhook → Method:
POST - URL: Your n8n webhook URL (we’ll set this up in Step 3)
Request body:
{
  "contact_id": "{{ contact.hs_object_id }}",
  "first_name": "{{ contact.firstname }}",
  "email": "{{ contact.email }}",
  "message": "{{ contact.service_inquiry }}"
}
Save and activate the workflow.

Image: The Hubspot Outgoing webhook
Step 3: Build the n8n Flow
This is where the magic happens. We’ll take the webhook data, run it through ChatGPT, and send the reply back to HubSpot.
1. Webhook Node
- Add a Webhook node in n8n:
- Method:
POST - Path:
incoming-lead-message
Respond immediately with:
{ "status": "received" }

Image: n8n node that handles incoming webhook
2. ChatGPT Node
- Add an HTTP Request node connected to the webhook.
- Method:
POST - URL:
https://api.openai.com/v1/chat/completions - Headers:
Authorization: Bearer YOUR_OPENAI_API_KEYContent-Type: application/json
Body:
{
  "model": "gpt-3.5-turbo",
  "messages": [
    {
      "role": "system",
      "content": "You are a helpful assistant responding to leads for a marketing agency."
    },
    {
      "role": "user",
      "content": "{{$node['Webhook'].json.body.message }}"
    }
  ]
}
Note: Feel free to refine the prompt to better fit your use case. Also, you can switch to the GPT model that best meets your needs.

Image: ChatGPT Reply node
3. HubSpot API Node (Log Reply)
- Add another HTTP Request node.
- Method:
POST - URL:
https://api.hubapi.com/crm/v3/objects/notes - Headers:
Authorization: Bearer YOUR_HUBSPOT_ACCESS_TOKENContent-Type: application/json
Body:
{
  "properties": {
    "hs_note_body": "{{ $node['ChatGPT Reply'].json['choices'][0]['message']['content'] }}",
    "hs_timestamp": "{{new Date().toISOString()}}"
  },
  "associations": [
    {
      "to": {
        "id": "{{$node['Webhook'].json.body.contact_id }}"
      },
      "types": [
        {
          "associationCategory": "HUBSPOT_DEFINED",
          "associationTypeId": 202
        }
      ]
    }
  ]
}
Note: This example assumes you are creating a contact note in Hubspot. If you want to handle any other entity, please refer to the Hubspot API for the right endpoint and the association type IDs.
Step 4: Test the Workflow
- Open your HubSpot form and submit a test entry.
- In n8n, watch the Webhook node capture the payload.
- ChatGPT should generate a reply.
- The HubSpot API node logs that reply as a Note on the contact’s profile.
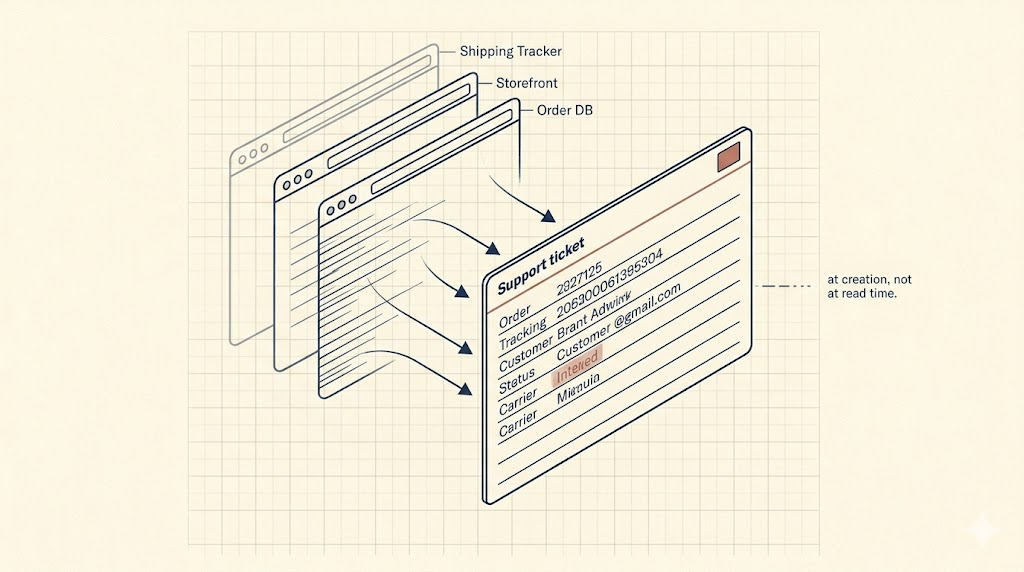
Check your contact in HubSpot, you should see something like:

Step 5: Ideas for Improvement
This is just the foundation. You can:
- Send replies via email or SMS instead of just logging notes
- Add keyword triggers to escalate to a human
- Personalise tone based on lead source or past conversations
- Turn it into a Hubspot Marketplace app if you want to commercialise it
Wrapping Up
In a weekend, you’ve gone from a blank CRM to a smart assistant that replies instantly to leads, never forgets to follow up, and logs everything neatly.
There you go! This should be a good starting point for even more ambitious AI-driven sales tools.
If you’d like this exact workflow set up for your business, or customised to your sales process, book a discovery call with me.